To improve archery accuracy, make every shot the same before you try to aim better. Use a stable stance, the same anchor point every time, a relaxed bow hand, a release driven by back tension, and a follow-through held until the arrow lands. Shoot for tight groups first, then move your sight, and track scores to find what limits you.
Updated November 2026
Shooting more arrows does not automatically make you more accurate. This guide covers the form habits and practice methods that turn scattered arrows into consistent groups, for recurve, barebow and compound archers.
Quick Accuracy Wins
- • Anchor consistently: same spot, every shot
- • Focus on the target, not the sight pin
- • Relax your bow hand: no squeezing the grip
- • Follow through: hold position after release
- • Breathe: exhale part way, settle, shoot
1. Perfect Your Stance
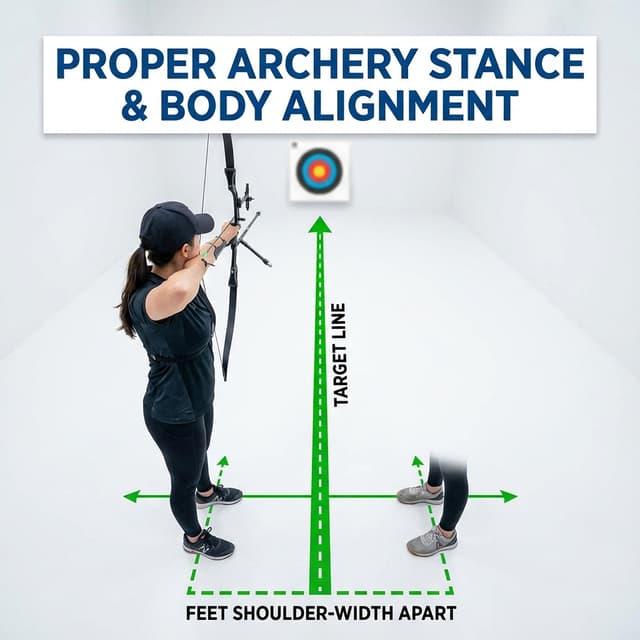
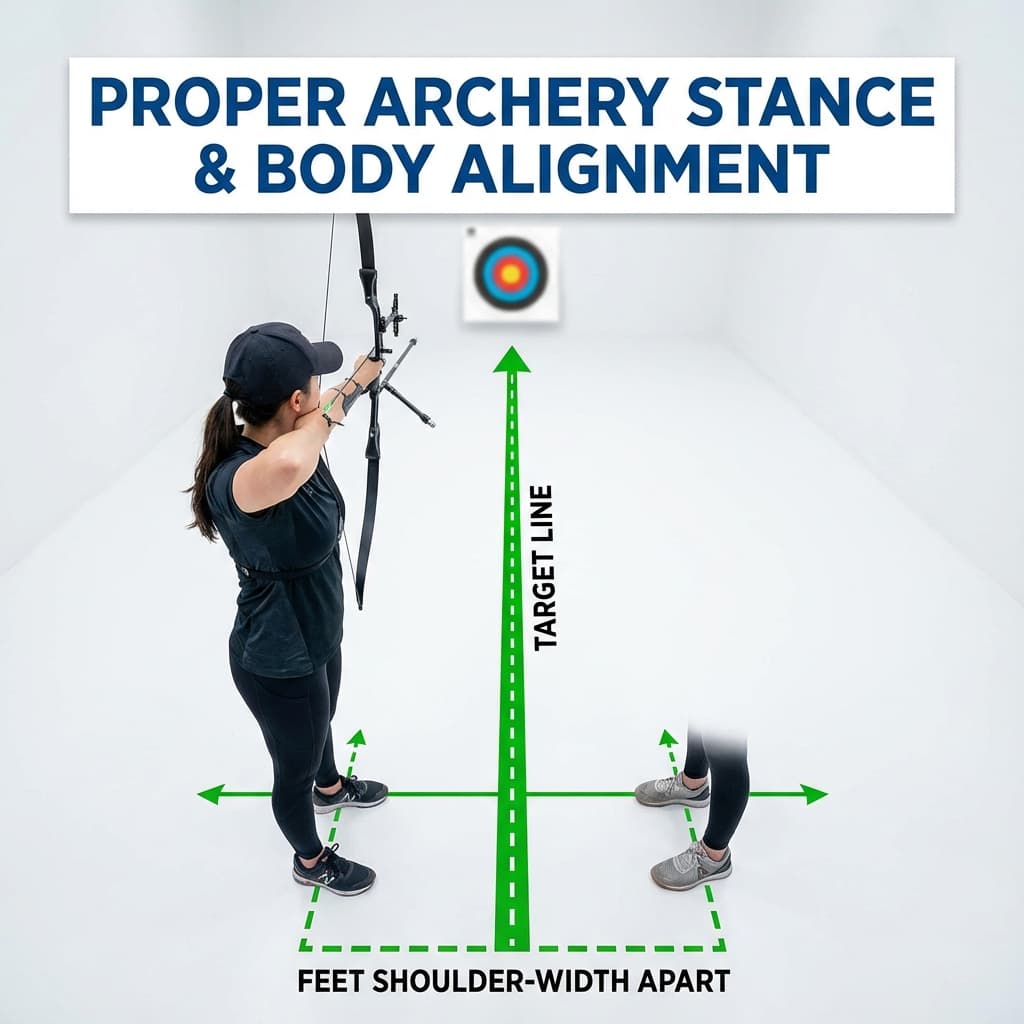
A consistent archery stance gives every shot the same starting point, which is why accuracy starts with your feet. If your feet, hips or upper body change position between arrows, the angle of your bow arm changes too, and arrows spread left and right even when your release is clean. Most archers start with a square stance: feet about shoulder-width apart, side-on to the target, with your toes on a line that points at the center of the target. Keep your weight balanced on both feet, knees straight but not locked, and your torso upright without leaning toward or away from the target. Some archers later move to a slightly open stance, with the front foot drawn back a little, which can make it easier to keep the bow arm clear of the string. Whichever you use, the key is repeating it exactly on every arrow, ideally by marking where your feet go.
The Basic Archery Stance
- • Feet shoulder-width apart: side-on, toes on a line toward the target
- • Weight evenly distributed: roughly 50/50 on both feet
- • Knees straight but relaxed: not locked
- • Hips stacked over feet: no twisting toward the target
- • Torso upright: no leaning forward or back
Tip: Mark where your feet go with tape or golf tees. Consistent foot placement leads to more consistent shots.
2. Lock In Your Anchor Point
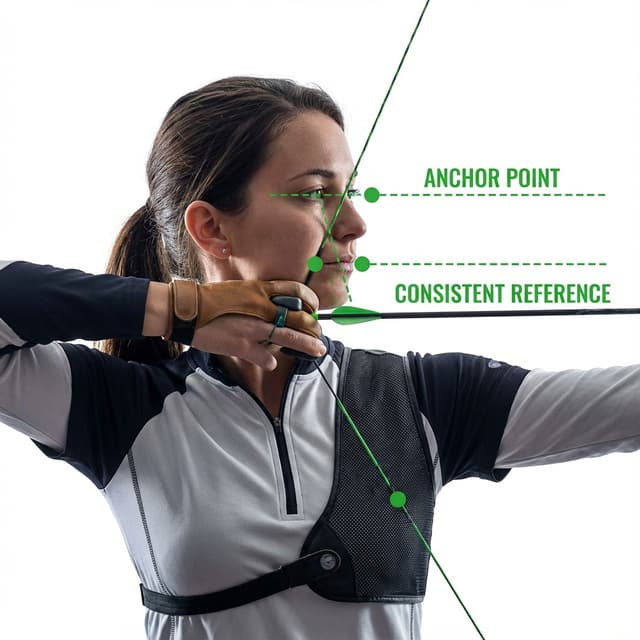
The anchor point is the spot where your draw hand or string touches your face at full draw, and keeping it identical is one of the biggest factors in repeatable accuracy. Your eye and the arrow form a fixed geometry only when the anchor is the same, so even a few millimeters of difference moves the arrow on the target, and the error grows with distance. Olympic-style recurve archers usually anchor under the jaw, with the string touching the center of the chin and the tip of the nose. Barebow and traditional archers often anchor higher, with the index finger at the corner of the mouth, which puts the arrow closer to the eye for aiming without a sight. Compound archers usually tuck the release hand behind the jaw and use a peep sight and sometimes a kisser button as extra checks. Use at least two contact points so you can feel when something is off.
Recurve and Barebow Anchor Points
- • Olympic recurve: hand under the jaw
- • String touches the center of the chin and the tip of the nose
- • Barebow: index finger at the corner of the mouth
- • Tab or fingers feel the same jaw or face position every shot
Compound Anchor Points
- • Release hand knuckle behind the jawbone
- • Peep sight centered around the scope housing
- • Kisser button at the corner of the mouth, or nose touching the string
- • Consistent head position
3. Master Your Aiming Technique
Good aiming in archery means accepting a small, steady movement of the sight rather than trying to freeze it. Every archer's sight pin or arrow point drifts slightly at full draw because muscles are never perfectly still. When you try to force the pin to stop, you tense your arm and shoulder, hold too long and often snatch the release the moment the pin crosses the center. That is called pin chasing, and it is a common cause of wide shots and, over time, target panic. A better approach is to focus your eye on the center of the target, let the pin float in a small area around it, and keep expanding through the shot until the release happens. For recurve archers, holding at full draw for only a few seconds usually works best. Arrows land around the center in a group, which you can then move with a sight adjustment.
Don't: Pin Chasing
Trying to force your pin to stay perfectly still causes muscle tension and jerky releases. The pin will move, and that is normal.
Do: Float and Execute
Accept that your pin will float in a small area. Focus on the target, let the pin settle, and execute a smooth release while it is in the zone.
4. Relax Your Bow Hand and Execute a Clean Release
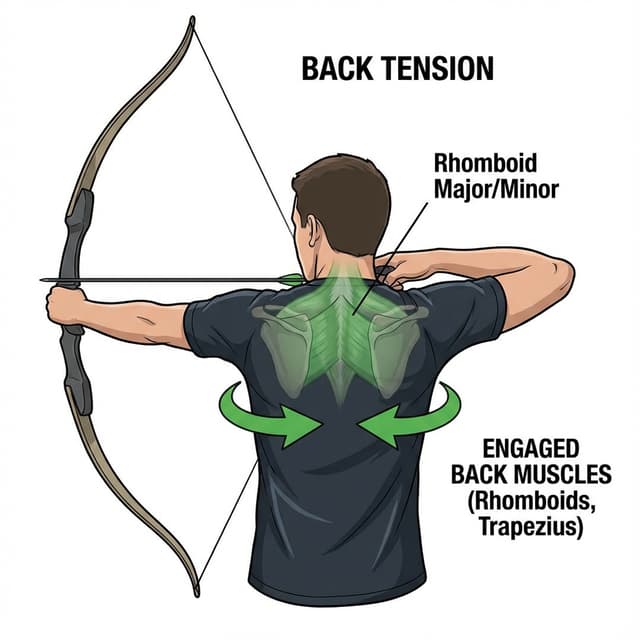
The release and the bow hand are where many accuracy problems start, because any tension at the moment the string leaves moves the bow before the arrow clears it. A clean release for a recurve or barebow archer means the drawing fingers relax and the string slips away, while the back muscles keep pulling so the draw hand moves straight back along the face. For a compound archer it means the release aid fires while you keep pulling through, without punching the trigger. The bow hand matters just as much. Pressure should sit on the pad below the thumb, with fingers loose and the wrist relaxed. If you squeeze the grip or push the bow toward the target as you release, the bow kicks and arrows often land high, or to one side if the hand twists. A finger sling or wrist sling lets you keep the hand open without worrying about dropping the bow.
The short video below shows how a bow hand that grips and pushes at the shot sends arrows high, and what the fix looks like.
Keys to a Clean Release
- • Relax your bow hand: no death grip, let the bow move freely
- • Back tension: use your back muscles, not just your fingers
- • Surprise release: don't punch the trigger or open your fingers on command
- • Consistent pressure: same finger or hand pressure each time
5. Hold Your Follow-Through
Follow-through is the position you hold after the release, and it protects accuracy by stopping you from moving while the arrow is still on the bow. The arrow leaves the string in a fraction of a second, but archers who drop the bow arm, turn their head to watch, or let the draw hand fly out to the side usually start that movement just before release. The fix is to plan the shot to finish after the arrow lands. Keep your bow arm pointing at the target until you hear the arrow hit, let your draw hand travel straight back along your jaw and neck, and keep your head and eyes still. Some coaches ask beginners to count to two after every release before moving anything. A consistent follow-through also tells you a lot. If your finishing position looks different from shot to shot, your release probably is too.
- • Keep your bow arm up until the arrow hits
- • Let your release hand drift back naturally along your face
- • Hold your head still and don't peek early
- • Watch where the arrow lands
6. Archery Training Techniques That Work
The most effective accuracy drills separate form from aiming, so you can repeat the shot without worrying about where the arrow lands. Blank bale shooting is the classic example: you stand very close to a target with no face on it, often about 3 to 5 feet away, and shoot with your eyes closed or unfocused, paying attention only to how the shot feels. A timing drill builds a rhythm by counting through each step of the shot so that you hold for a similar time on every arrow, which reduces rushed or overheld shots. A distance ladder shows you where your form currently holds up: you start close, move back after a set of good arrows, and note where groups begin to open. Short sessions of 30 to 50 focused arrows with one clear goal usually help more than long sessions with no plan. Stop when your form starts to slip.
Blank Bale Shooting
Shoot at a blank target 3-5 feet away with your eyes closed. Focus purely on form without worrying about aiming.
Timing Drill
Use a consistent shot routine. Count to yourself: Draw (1-2), Anchor (3), Aim (4-5-6), Release (7).
Distance Ladder
Start at 10 yards. Shoot 3 good arrows. Move back 5 yards. Repeat until your groups open up. That is your current limit.
7. Track Your Scores to Find What Limits You
When your scores stop improving, the cause is usually one specific form fault, and tracking where your arrows land is the fastest way to find it. Record every end, not just totals, and note the distance, target face and bow. Then look at where arrows group over several sessions. A group that sits consistently in one direction usually points to sight setting or a repeated habit, such as a gripping bow hand sending arrows high. A group that is wide in every direction usually points to an inconsistent anchor or release. Compare your average arrow score week to week rather than judging single rounds, because one bad day says little. Once you know the pattern, pick one fix, practice it for a couple of weeks, and check whether the group tightens. ArcheryBuddy lets you log arrows on a target face and see your group plot and averages.
The video below walks through how to find the one leak behind a score plateau and what to train next.
Frequently Asked Questions
How long does it take to improve archery accuracy?▼
Why do my arrows group to one side?▼
Should I focus on grouping or hitting the center?▼
How many arrows should I shoot per practice session?▼
Track Your Accuracy Improvement
ArcheryBuddy is a free iPhone and Android app. Log your arrows on a target face to see your group plot and averages, and film a short side-on video for an AI form check with a score out of 10, three strengths and one fix (one free check a week).
Quick Accuracy Checklist
- ✓Stance: Feet shoulder-width, weight balanced, body relaxed
- ✓Anchor: Same contact points every single shot
- ✓Aim: Focus on the target, let the pin float, don't chase
- ✓Release: Relaxed bow hand, surprise release using back tension
- ✓Follow-Through: Hold position until the arrow hits
- ✓Tracking: Watch your group pattern to find the one fix that matters