In your first 30 days of archery, focus on safety and form, not score. Spend week one on stance, grip and anchor at 5 to 10 yards, week two on release and back tension, week three on aiming and grouping, and week four on a repeatable routine at 20 yards, using a light bow of around 15 to 25 lbs.
Updated November 2026
Whether you have just bought your first bow or are taking your first lessons, this 30-day plan gives you a structured, day-by-day practice schedule. It works for recurve, barebow and compound, with notes where the bows differ.
What You'll Achieve in 30 Days
A realistic goal for a beginner after 30 days of regular practice is safe, consistent shooting at about 20 yards (18 meters), not perfect scores. If you shoot three or four sessions a week and follow a plan, you can usually expect to know the range safety rules, string or set up your bow, stand and grip the same way each shot, anchor at the same spot on your face, and group most arrows on a standard target face. Many beginners also shoot their first scored round in the third or fourth week. What you should not expect is a finished technique. Back tension, a clean release and a steady aim take months to settle, and that is normal. Measure progress by how repeatable your shot feels and how tight your groups are, rather than by how many arrows hit the center. Keep the draw weight light so your form, not your strength, decides where arrows land.
Proper range etiquette
Consistent technique
10-20 yard accuracy
Ready for the range
Week 1: Foundation
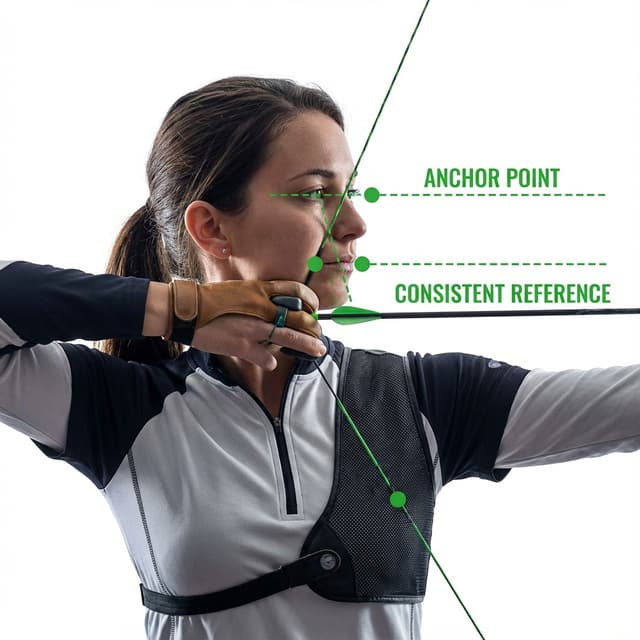
The first week of archery is about safety, equipment and the parts of the shot that happen before release: stance, grip and anchor. Spend the first two days learning range rules, such as never dry firing a bow (releasing the string without an arrow), only shooting when the range is clear, and always checking what is behind the target. Learn the parts of your bow: riser, limbs, string and arrow rest. From day three, shoot a small number of arrows at very close range, about 5 yards, ideally into a blank target boss so you are not tempted to aim. Stand with your feet about shoulder-width apart, side-on to the target, with your weight balanced. Hold the bow with pressure on the pad below your thumb and relaxed fingers. Then choose one anchor point, such as the corner of your mouth or under your jaw, and touch it the same way every shot. Keep sessions short, around 20 to 40 arrows.
Days 1-7: Learn the Basics
Day 1-2: Safety and Equipment
- • Learn range safety rules (never dry fire, always check behind the target)
- • Understand your bow parts (riser, limbs, string, rest)
- • Practice stringing and unstringing with a stringer (recurve) or safe storage (compound)
- • 0 arrows shot, just learning
Day 3-4: Stance and Grip
- • Practice a square stance (feet shoulder-width, side-on, toes on a line pointing at the target)
- • Learn proper bow grip (pressure on the thumb pad, relaxed fingers)
- • 20 arrows at 5 yards (blank bale if possible)
Day 5-7: Draw and Anchor
- • Practice drawing with your back muscles, not just your arms
- • Find your anchor point (corner of mouth or under the jaw)
- • Focus on consistency: same anchor every time
- • 30-40 arrows per session at 5-10 yards
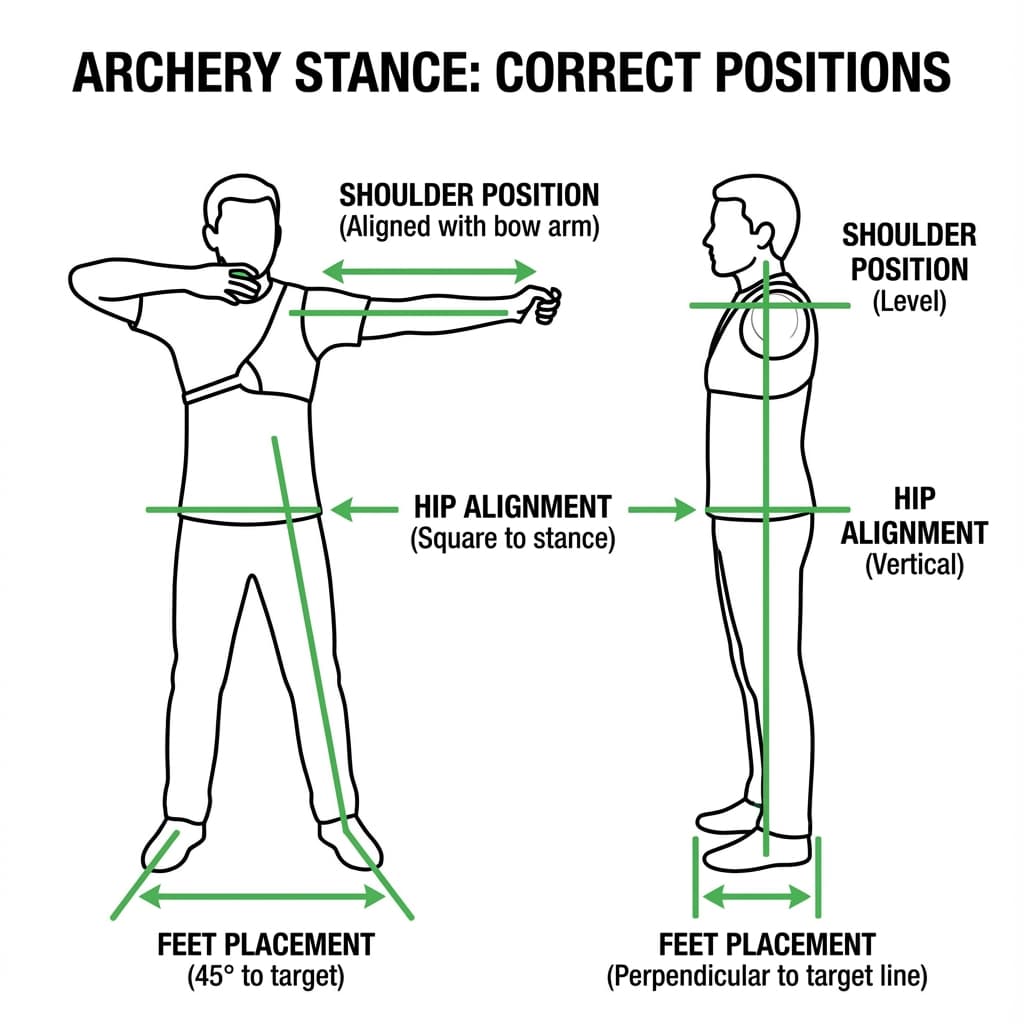
Archery stance: feet about shoulder-width apart, body side-on to the target
Week 2: Building Form
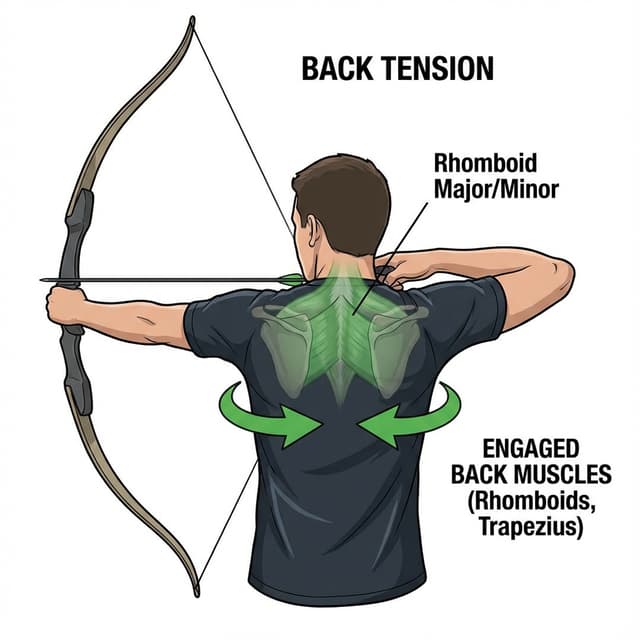
Week two adds the release, the follow-through and back tension, which together turn separate positions into one smooth shot. A clean release means the string leaves your fingers because they relax, not because you flick them open or pull your hand away. On a compound, the same idea applies to a release aid: the shot should go off without you punching the trigger. After the release, keep your bow arm up and your head still until the arrow lands. Back tension means drawing and holding with the muscles between your shoulder blades, so your draw elbow moves around behind you rather than your arm doing all the work. Keep your bow shoulder low and set, because a raised bow shoulder is one of the most common beginner faults. Move to about 10 yards early in the week and 15 yards by the end, and shoot 40 to 50 arrows per session.
The short slow-motion clip below shows two archers side by side, one with a raised bow shoulder and one with a set shoulder, so you can see how much the arrow moves.
Days 8-14: Refine Your Shot
Day 8-10: Release and Follow-Through
- • Practice a relaxed finger release (don't pluck the string)
- • Hold your follow-through until the arrow hits the target
- • Work on not dropping your bow arm after release
- • 40 arrows at 10 yards
Day 11-12: Back Tension
- • Learn to engage your shoulder blades (scapula)
- • Practice "pulling through" the shot
- • Use resistance band exercises at home
- • 40 arrows focusing on back tension
Day 13-14: Combined Form
- • Put all the elements together: stance, draw, anchor, release
- • Develop your basic pre-shot routine
- • Move to 15 yards
- • 50 arrows per session
Week 3: Aiming and Accuracy
Week three is when beginners start aiming deliberately and judging their shooting by groups. How you aim depends on your bow. Barebow and traditional archers often use gap shooting, where the arrow tip sits a set distance below or above the target center, and that gap shrinks as distance grows until you reach your point-on distance. Archers with a sight move the sight pin in the direction the arrows land: if the group is low, move the pin down; if it is left, move the pin left. Only adjust once your arrows form a group, because moving a sight to chase scattered arrows hides form problems. Practice at 10, 15 and 20 yards on a target face. At the end of the week, shoot your first scored round, such as 30 or 60 arrows, write the total down, and keep it as a starting point rather than a verdict on your ability.
Days 15-21: Hit the Target
Day 15-16: Gap Shooting or Sights
- • If barebow: learn gap shooting (arrow tip as reference)
- • If using a sight: basic sight adjustment (follow the arrows)
- • Understand point-on distance
- • 50 arrows at 15 yards on a target face
Day 17-19: Grouping
- • Focus on tight groups, not bullseyes
- • Adjust your aim only after you have consistent groups
- • Practice at 10, 15, and 20 yards
- • 60 arrows per session
Day 20-21: Scoring
- • Shoot your first scored rounds
- • Learn to record and track scores
- • Don't stress about the number; focus on form
- • 60 arrows, scored
Week 4: Consistency and Confidence
The fourth week ties everything into a repeatable pre-shot routine and tests it at slightly longer distances. A pre-shot routine is the same short sequence before every arrow, for example: set your feet, set your grip, raise the bow, draw, anchor, aim, release and follow through. Doing it identically each time is what makes groups tighter. In the middle of the week, step back gradually to 20, 25 and then 30 yards, and move closer again whenever your form breaks down, since distance magnifies every error. Session size can rise to 60 or 70 arrows if your form holds, but stop when you notice your shots getting rushed or your bow arm dropping. Finish the month with a full scored round at your most comfortable distance. Write down the score and your distance so you have a baseline to compare against after the next 30 days of practice.
Days 22-30: Solidify Your Skills
Day 22-24: Pre-Shot Routine
- • Develop and practice your full pre-shot routine
- • Same routine, every arrow, no exceptions
- • 60 arrows with deliberate routine practice
Day 25-27: Distance Progression
- • Gradually increase distance (20, 25, 30 yards)
- • Maintain form as distance increases
- • If form breaks down, move closer
- • 60-70 arrows per session
Day 28-30: Assessment
- • Shoot a full scored round at your comfortable distance
- • Record your baseline score for future comparison
- • Film a short side-on video of your shot to review your form
- • Note one thing to work on next month

Your 30-day plan: Foundation, Form, Accuracy, Confidence
Beginner Equipment Checklist
A beginner archer needs only a few essentials: a bow with a light draw weight, a matched set of arrows, an arm guard and finger protection. For a recurve, most adults start with limbs of about 15 to 25 lbs, and many clubs start beginners lower still. Arrows need the right spine (stiffness) and length for your bow and draw length, so ask a shop or club coach to match them rather than buying a random set. An arm guard protects the inside of your forearm from string slap, and a finger tab or glove protects your drawing fingers on a recurve or barebow. Compound archers use a mechanical release aid instead. A quiver and bow stand are useful but not urgent, and a sight is optional for recurve beginners, since many learn barebow first. Buy the essentials, shoot for a few weeks, then upgrade once you know what you need.
| Item | Priority | Notes |
|---|---|---|
| Bow (recurve or compound) | Essential | Start with a lower draw weight |
| Arrows (6-12) | Essential | Match spine and length to your bow |
| Arm guard | Essential | Protects from string slap |
| Finger tab, glove or release aid | Essential | Tab or glove for recurve and barebow, release aid for compound |
| Quiver | Recommended | Hip or back quiver |
| Sight (compound/Olympic recurve) | Optional | Can learn barebow first |
| Bow stand | Optional | Keeps the bow safe at the range |
Common Beginner Mistakes
The most common beginner archery mistakes come from rushing: a bow that is too heavy, a tight grip, chasing the center before the shot is consistent, and shooting too many arrows while tired. A draw weight that is too high makes you shake, lift your bow shoulder and cut your draw short, so start light, around 15 to 25 lbs for most adults, and increase it over months. Squeezing the grip twists the bow at release and usually pushes arrows sideways, so keep your bow hand relaxed with pressure on the thumb pad. Aiming harder rarely fixes scattered arrows, because the cause is usually an inconsistent anchor or release. Finally, more arrows is not always better practice. Once your form starts to slip, each extra arrow trains the slip. A useful rule is to stop or take a break as soon as two or three shots in a row feel different from your normal shot.
Starting with too heavy a draw weight
Start light (15-25 lbs) and build strength over months
Gripping the bow too tight
A relaxed grip lets the bow react naturally
Focusing on accuracy before form
Consistent form produces accuracy, not the other way around
Shooting too many arrows
Quality over quantity. Stop when form degrades
Track Your First 30 Days
ArcheryBuddy is a free iPhone and Android app. Film a short side-on video of your shot for an AI form check with a score out of 10, three strengths and one fix (one free check a week), log your scores on a target face, and practice with 2-minute home drills.
Key Takeaways
- ✓Week 1: Learn safety, stance, grip and anchor at 5-10 yards
- ✓Week 2: Build a relaxed release, follow-through and back tension
- ✓Week 3: Learn to aim, group your arrows and shoot your first scored round
- ✓Week 4: Repeat one pre-shot routine and record a baseline score
- ✓Start with a low draw weight and increase it gradually
Every experienced archer started where you are now. Keep the bow light, keep sessions short and focused, and judge your month by how repeatable your shot has become.